Background
Xero Shoes aren’t really shoes at all — they’re sandals. Mind, they’re not just any sandals, they’re
huaraches. Yes, “huaraches” is just Spanish for “sandals” — that’s not the point — huaraches are the “sandal tech” made out of leather and old tires worn by the Tarahumara Indians while traversing miles and miles through the
Copper Canyons of Mexico.
As legend has it, the Tarahumaran Manuel Luna taught Barefoot Ted how to make his first pair (circa 2006?), Ted took what he learned home and began sharing how to make huaraches in the U.S., and next thing you know, a few years go by and today
you’ve got numerous flavors of huaraches to choose from, as well as a few new takes on the ancient sandal tying style.
One of the early movers and shakers in the burgeoning huaraches (pronounced wah-rah-chaise … or at least that’s how I try to say it) movement was Steven Sashen, a runner/sprinter, long-time entrepreneur, guru, and ex-comedian. You might know him from his
Sh*t Barefoot Runners Say videos. Anyway, a few years back Steven made his first pair of huaraches. As he was running in them, fellow members of the
Boulder Barefoot Running Club took note and asked Steven how to make their own.
One thing led to another and it wasn’t long before Steven decided to make huaraches on a much larger scale and so
Xero Shoes was born.
Xero Shoes got its humble beginnings selling DIY kits including a sheet of Vibram rubber and colorful nylon laces. Countless kits later, Xero Shoes decided to bring to market the first ever molded rubber made-for-huaraches sole. And to date, these are still the only huaraches that use their own dedicated sole design (as opposed to cutting soles from flat sheets of rubber).
Today,
I’m going to be reviewing the Xero Shoes Connect (4mm thick sole) and Contact (6mm thick sole). I’ll be taking an approach that’s not so much about running in Xero Shoes and more about wearing them all the time — as an ultra-minimalist sandal. I’ll do a comparison of the Connect vs. the Contact, and I’ll touch on how the Xero Shoes stack up against competitors.
The basics on huaraches
Huaraches are basically just a sole that is adhered to the bottom of your foot using rope, twine, or string that loops or is tied to the sole in as few places as possible. The most traditional, simplest huaraches design utilizes three points of attachment:
- One between the two biggest toes (like a pair of thongs or flip-flops), and
- One each on either side of the ankle to make for three total points of attachment.
The rope is laced up through the thong, over to the outer ankle hole, down through the sole and back up and around the initial string, around the ankle and down/around the inner ankle hole, and then back up to complete the loop. Mind, this isn’t the only way to tie a pair of huarache sandals but it’s one of the more popular ways because this method is the “slip on” style tying method. Basically, once tied right, it’s a set it and forget it style lacing. This is the primary way I wear all my huaraches (See
my review of the Luna Catamount huaraches to see this done without any doubling back of the lace if you’re struggling to follow how the lacing works).
Via these three points of attachment, the sole is “stuck on” at the midfoot via the thong, it’s balanced from sliding (much) left and right on the foot via the two opposed ankle attachment points, and it’s held flat against the heel via the ankle attachment points. The hole set-up functions thanks to tension: you can’t really wear a pair of huaraches “loose” (like a flip flop, Chaco’s, or pair of Birkenstocks). If a pair of huarache sandals are loosely tied, they’re going to fall off your foot.
My one general “gripe” about huaraches is that past the “knot” at the midfoot, the sole is left detached from your foot, which will result in it hanging below your toes when they dorsiflex. Why is that an issue? Well, depending on just how low below your toes the sole hangs, it can snag the ground when walking (or running) and pull under your foot.
I have to layout the above basics on huaraches because really, a pair of huaraches derives all its character from the sole and laces used. Just how well any pair works is going to depend on it’s approach to the sole and the laces.
So let’s get this review underway already.
Those colorful nylon laces
Xero Shoes all come with the same nylon/polypropylene laces (in different colors). While some other huaraches like
Luna Sandals use leather or hemp laces,
Xero Shoes utilize nylon/polypropelyne laces. There are a few reasons for this. The stated reasons for this are that they are water-resistant (leather stretches/shrinks when wet), are round rather than edgy leather laces which can irritate your skin (and definitely make knots a little harder to dial-in), don’t require break-in, and won’t stretch over time. I’ll add that they have a lighter weight relative to their strength. What I’ve noticed is that when I take off my Xero Shoe sandals, the laces tend to maintain their shape as though my foot was still in the sandal. By contrast, the leather, elasticized leather, or webbing ATS laces on my Luna Sandals all “flop” back to the sole as soon as my foot is taken out of the sandal. It’s a small thing, but maintaining the structure of the laces sans feet actually makes putting on the
Xero Shoes huaraches that much faster/easier.
The other thing is that by not stretching, it’s a lot less frustrating trying to “set it and forget it” with the slip-on style tying method. Break-in and dialing in huaraches tying takes patience, and in my experience, I find the laces used by Xero Shoes to make tying a lot less frustrating because they don’t break-in or stretch.
As for figuring out the lacing the first time, well, it’s a little tricky and you’re going to be constantly Googling and watching videos trying to make sure you did it right. The funny thing about that is that outside of the basic lacing concept, there’s really no “wrong” way to lace up a pair of huaraches. It’s only ever wrong insomuch as your foot isn’t well attached to the sole. So be patient with yourself and don’t worry about messing it up too much. If you’re really concerned, you can opt for the pre-made, pre-cut-to-your-foot-shape Xero Shoes which will be laced already in the slip-on style. More on this later.
As for the dreaded “knot” that rests under your toes, generally, it’s not an issue. Because there’s a big gap between your toes where this knot is underfoot, things tend to work out where the knot goes unnoticed by your foot. It just ends up pushing up into the gap between your toes. As for wear on the knot, it seems that the knot can hold a good bit of abuse. And in the event it fails, you just pull some more thread through, re-tie, and re-set (using a little flame) and you’re golden.
Going in depth on tying huaraches is a bit outside the scope of this review, so I’ll end with saying that there are volumes and volumes of tying styles and information on how to do it on the web. Google is your friend!
As for your lace options with Xero Shoes, you get a variety of lace colors to choose from: black, brown, a couple blues, a couple greens, pink, white, and red. Just to keep it straight in this review, my Contact 6mm Xero Shoes feature red laces (one with a “hand” pendant) and my Connect 4mms have black laces, no pendant.
Overall, the laces that Xero Shoes utilizes are incredibly functional and generally go unnoticed by my feet. That’s part of the “magic” I guess. The thong between your biggest two toes isn’t annoying either. The lace is just so minimal that it basically goes unnoticed. The only issue, if you can call it that, I’ve seen is that on prolonged use, when I take them off, I’ll see a little “groove” where the lace was in contact with my skin. It’s not irritated or anything—just a sign that the laces were taut enough to be depressing my skin. No big deal.
The FeelTrue™ Outsole
As I mentioned above,
Xero Shoes are the only huaraches available with a huaraches-specific, molded rubber outsole called the “FeelTrue™” outsole. What am I talking about? Basically, every other huaraches (like Luna Sandals) or huaraches-like manufacturer (e.g.
Unshoes or
Bedrock) simply cuts their soles from flat sheets of rubber. As you might guess, a flat sheet of rubber will translate into a flat huaraches sole. Some of these competitor soles “break-in” over time and assume a more foot-shaped curve, but out the gate they all start flat.
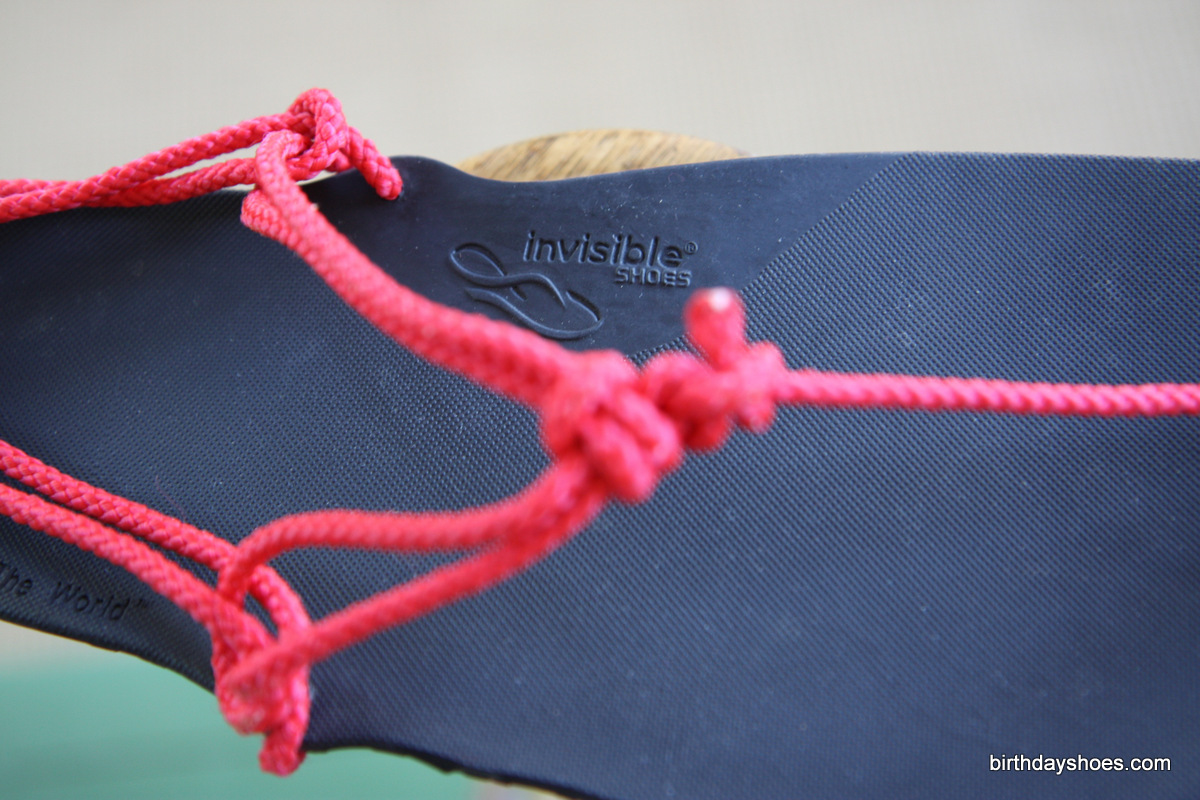
A close-up of the FeelTrue™ outsole, viewed from above. You can see the Xero Shoes logo on the arch — this is now changed to the Xero Shoes logo on any new huaraches you buy per the rebranding, how there are little “wings” that flare out for the ankle lace holes, and the very subtle texture embossed on the topside of the rubber outsole.
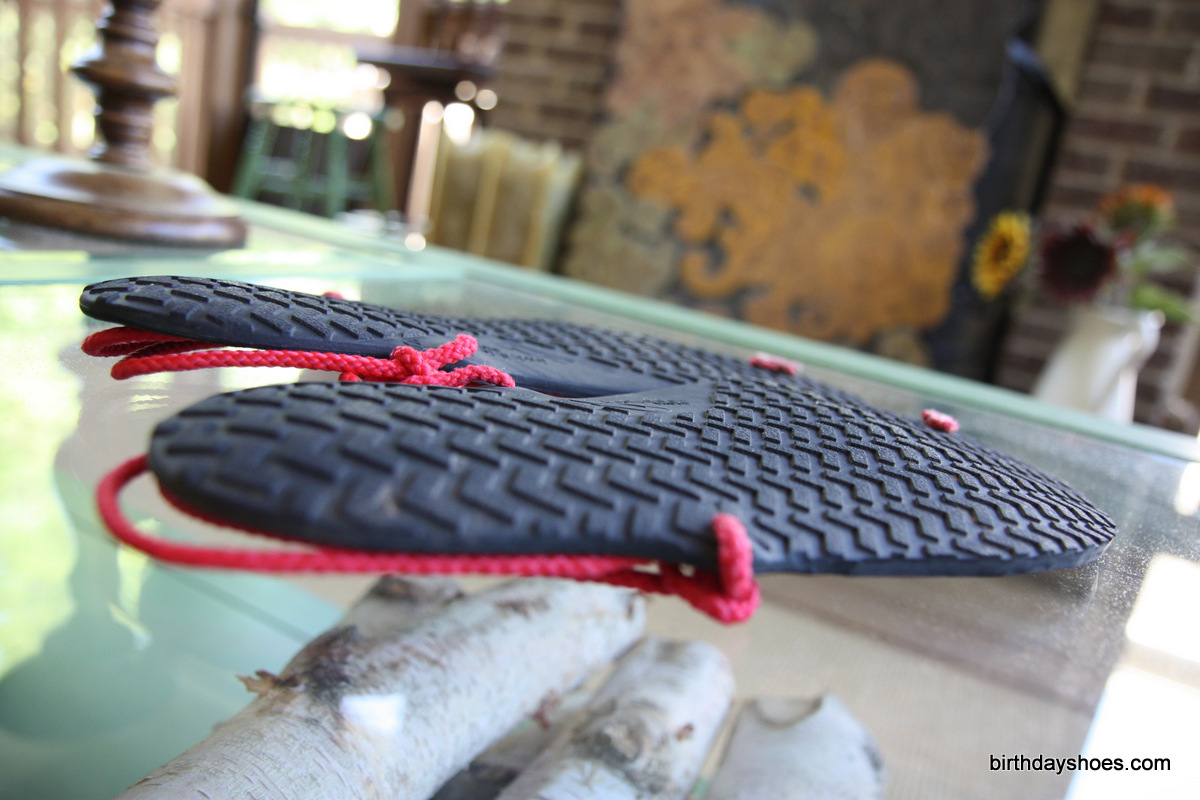
Comparatively, the FeelTrue sole has some curves built into its design. Specifically, it’s curved at the arch, rounded up a bit around the heel cup, has little reinforced, pre-punched “wings” at the ankle holes, has a custom tread underneath, a little bit of texture to improve grip on the bare foot, and has a little bit of lift at the toes (What’s known as “toe spring” and is common place in most footwear).
All these little huaraches-minded design features go a long, long way to making the Xero Shoes outsole stand out from competitors.
The FeelTrue outsole feels good underfoot. The smooth, yet textured topside of the FeelTrue outsole feels great on my bare foot. Comparatively, as with other huaraches or huaraches-like minimalist sandals, your foot touches a rubber surface that was never really intended to serve as an “insole.” It feels a little unrefined to my foot. So Xero Shoes’ FeelTrue texture just adds something marked to the feeling of the rubber against my bare skin. It’s a nice touch.
The rounded heel, slightly curved arch (non-supportive), and toe spring make the huaraches feel incredibly more “one” with my foot. That little bit of raised edge at the heel makes my heel feel more seated in the sole. Same goes for the arch. The slight toe spring, which collapses readily under any weight, helps lift the front of the huaraches up when your toes
aren’t pushing on it. This reduces the risk of tripping over that hanging bit of the huaraches sole. I’ve yet to have a “trip” with my Xero Shoes; comparatively, this was a common occurrence with my old 4mm Vibram Cherry homemade huaraches and happens at least once or twice a day walking around in the 10mm Vibram soles on a pair of Leadville Lunas (review pending).
The FeelTrue outsole is a solid foundation for a complete, finished product. Considering you could make your own huaraches from a kit or from materials you could hunt down locally, if you’re going to shell out some cash for a pair of huaraches, it’s nice to get a product — something more than raw materials. Don’t hear this as coming down on other sandal manufacturers who are using Vibram rubber-cut outsoles. They all are products in their own regard, too. Lunas all have a very “professional” finish to them. Unshoes and Bedrocks take a unique approach to lacing that would be difficult to DIY. It’s just that I wish they had soles that felt like they were designed from the get-go to be outsoles for sandals/huaraches. Make sense?
Oh and
they come with a 5,000 mile guarantee:
Xero Shoes 5,000 Mile Warranty
When people ask, “How long will my Xero Shoes last?” we say, “We don’t know. Nobody has worn out a pair yet!”
That’s why we offer this 5,000 mile warranty.
If you wear your FeelTrue™ outsoles down to less than 1mm thick at the ball or heel of the foot (not an edge), we’ll replace the outsoles.
Has anyone taken up
Xero Shoes on their warranty? I doubt it given you’d have to be putting a hundred miles a week on a pair for a year to reach 5K miles. It seems like it’d happen eventually though — and really, if you’re wearing holes through your huaraches due to high mileage, well, what better way to reward your enjoyment of a product than to keep you shod in it? It’s a clever bit of insurance/marketing.
If you can’t tell, I’m pretty impressed with the “FeelTrue” outsole you get with the Xero Shoes huaraches. Now, the big question is: which thickness do you go for? There’s the “Connect,” which is 4mm thick, or you can opt for the “Contact,” which is 6mm thick. While the only difference between the two is a mere 2mm of rubber thickness, that’s a 50% increase in thickness from 4mm to 6mm, and in my testing, makes for a pretty substantial difference in terms of function and barefoot feel.
The 6mm Contact
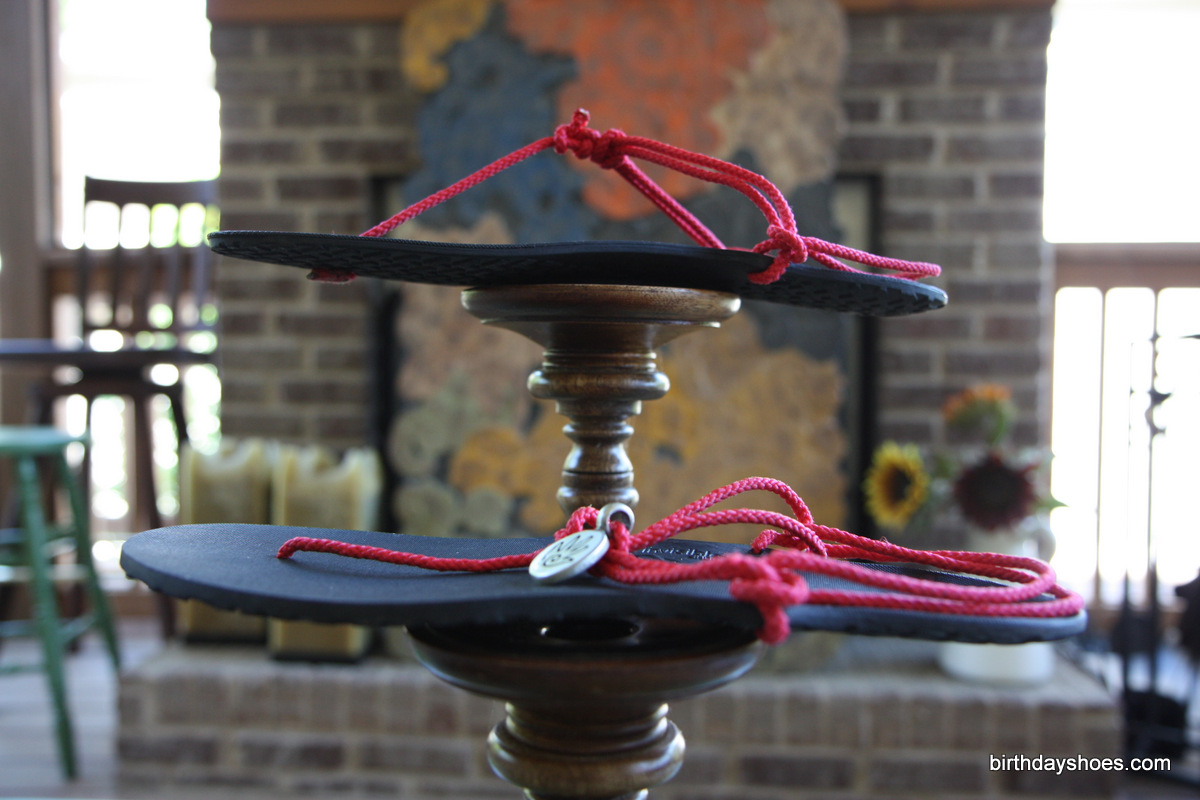
Above are the Contact 6mm thick Xero Shoes huaraches with red laces. Note that the only reason the laces are “collapsed” in the foremost sandal is because of the “hand” pendant, which is a neat accessory from Xero Shoes I bling out my pair. Obviously these are not Fivefingers … or are they?
The Xero Shoes website rightly points out that the 6mm thick Contact outsole provides a bit more protection than the 4mm thick Connect. The benefit of that extra 2mm goes beyond protection — it also adds some rigidity to the outsole, helping the Contact maintain its structure as your foot bends and flexes.
A little extra structure in the sole of the Contact means that it flexes and bends a little less between the thong-point and the ankle point. For me, this actually means that I notice the soles a little less because they stay stuck on my foot no matter what.
The downside of the extra 2mm of thickness in the Contact is that you lose a bit of ground feel. Just how much is hard to say, but overall, the ground feel of the Contact is excellent. It’s probably only slightly less than a pair of Classic or Sprint FiveFingers. That means you’re going to feel textures of the surfaces you walk on and gravel is going to “poke” your foot (a.k.a. the free foot massage).
Below are a slew of photos of the Contact so you can get a sense for them:
The 4mm Connect
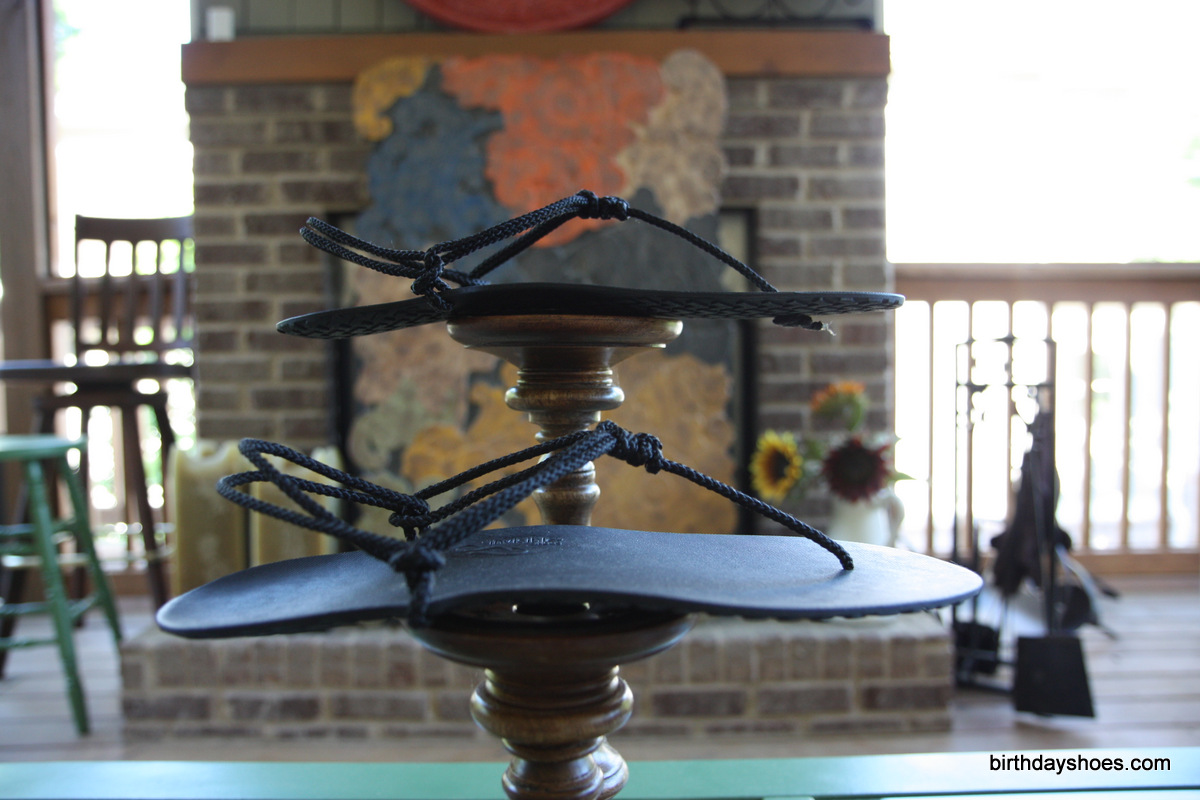
Above are the Connect 4mm thick Xero Shoes huaraches with black laces. These are the style that afford the most ground feel. Note how they somewhat sag off the pedestal; this is due to being less thick than the Contacts.
Reduce the sole thickness of the Contact by 2mm — 33% — and you get the 4mm thick Connect. The Connect is billed as being the closest thing to barefoot
but with protection.
Basically, the Connect gives you the most ground feel. How much ground feel? Well, it’s going to be similar to other 4mm rubber outsole shoes — like the Classic or Sprint FiveFingers. That means that a misplaced step on a stone (or Lego) is going to be impossible to miss. Textures shine through the rubber sole (walking on grass vs. concrete vs. a rug). The Connects definitely keep you grounded.
The only drawback to the Connect’s thinner sole is that it has less overall structure. So it’s more likely to flex throughout the sole either past the thong point (where the toe spring provides some help) or between the thong hole and the ankle holes.
Take a walk around on the Connects via photos!
Contact vs. Connect
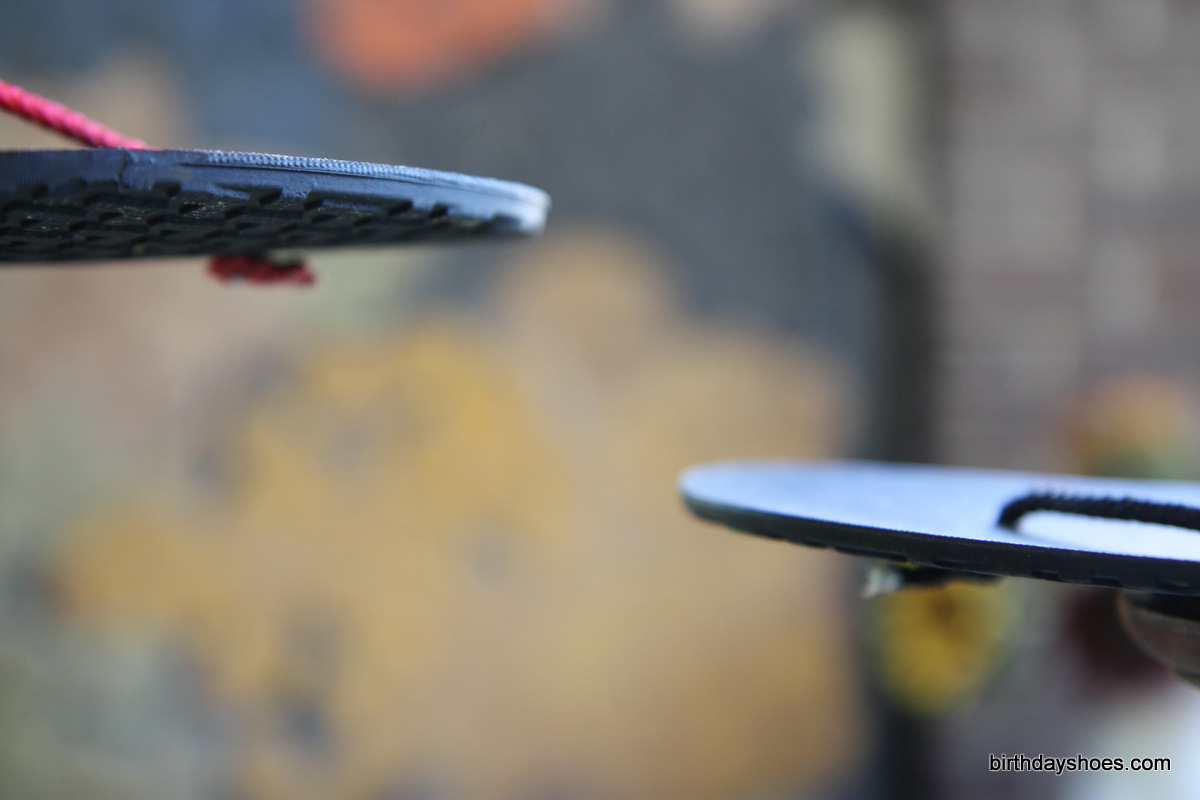
Above left is the front of a Contact InvisiShoes sandal. Note it’s slightly thicker than the 4mm Connects on the right. Also note the lace knot.
How are you to decide between the 4mm Connect and 6mm Contact? For one, the extra 2mm of thickness of the Contact is going to set you back a little more in terms of cost — about $5. Apart from price, the question you have to ask yourself is:
- Do I want more ground feel?
- Do I want more structure?
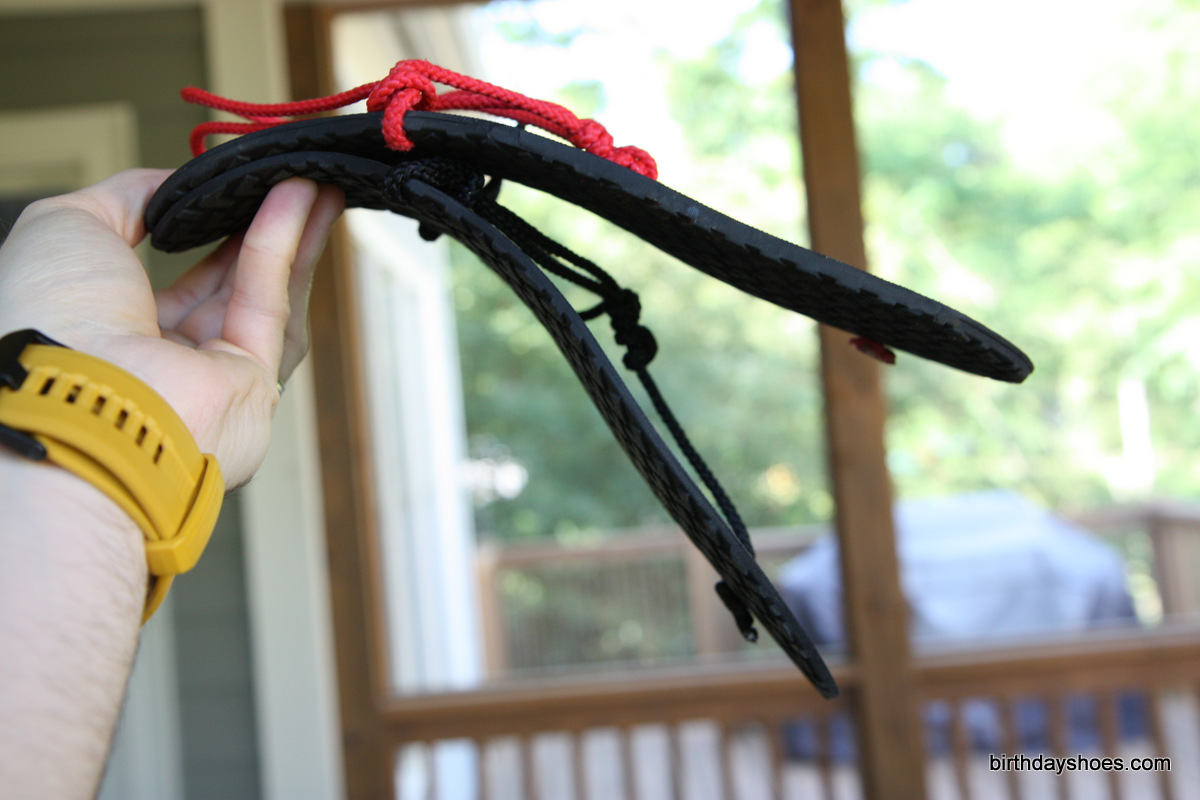
If you want more ground feel and don’t mind a little floppiness, then the Connect is the way to go. If you don’t mind losing a little ground feel in exchange for a sole that feels a little more solid, then you have to go Contact.
You can get a sense for how rigid the Connect is compared to the Contact by looking at the photo on the right, which shows how the Connect “hangs” lower than the Contact. Remember that with huaraches, they function thanks to the tension between the sole and the foot, as held together via the lacing system at three points. It seems that some rigidity in the sole helps this whole creation work. This is because having only three touch points on the sole mean that the parts of the sole that
aren’t attached to your foot (which is
most of the sole) is only going to stay “stuck” on your foot insomuch as there’s structure within the sole itself. Just think of the difference between a piece of paper and a piece of cardboard. If you rest a piece of paper on one finger, it will drape down around your finger. By comparison, a piece of cardboard won’t drape in this same scenario. In a way, you can see this happening when you look at
this photo of the Connect resting on a pedestal and contrast it against
the Contact on the same pedestal. See what I mean?
That’s sorta why rigidity of the sole matters with huaraches. To the extent the soles lack rigidity, they’re going to adhere less to your foot. For me, this is the most important decision between the Connect and the Contact — sole rigidity.
Here’s another way to look at sole rigidity. Below is how the Contact (red laces) and Connect (black laces) look with toes flexed up and down. You’ll note both the increased flexibility of the Connect and the slightly more sturdy toe spring of the Contact.
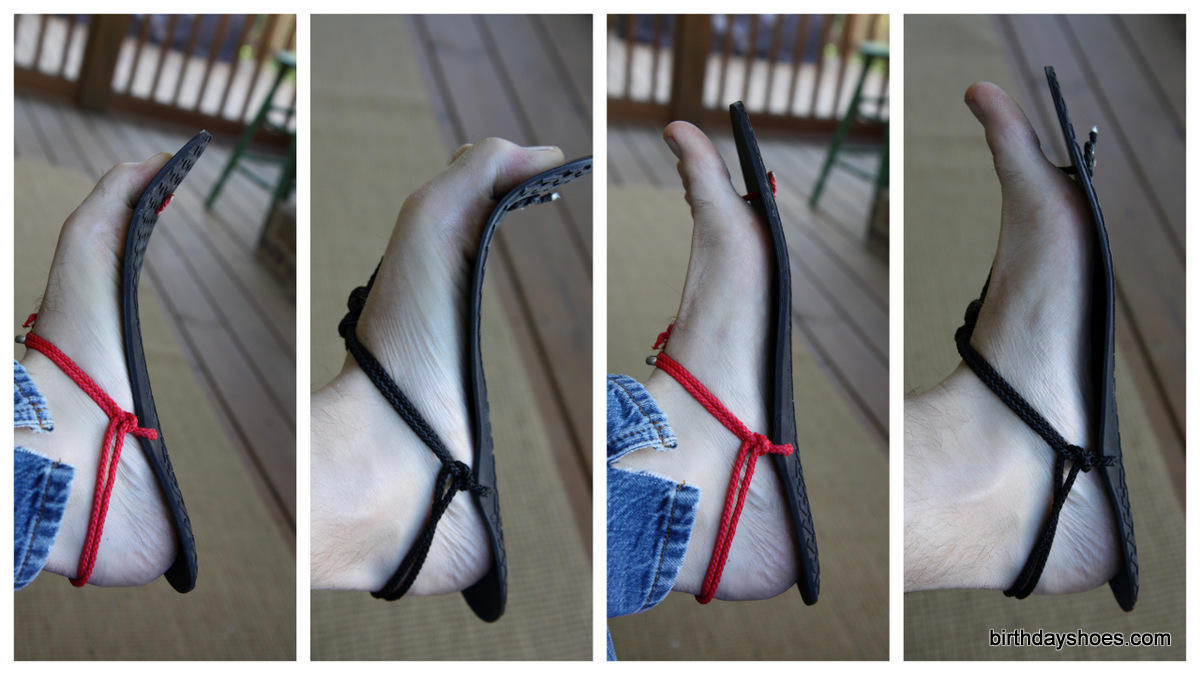
The Contacts and Connects alternate to show the flexibility of the 6mm Contact and 4mm Connect sole. You’ll also note that the Contacts have a bit more sturdy toe spring in them.
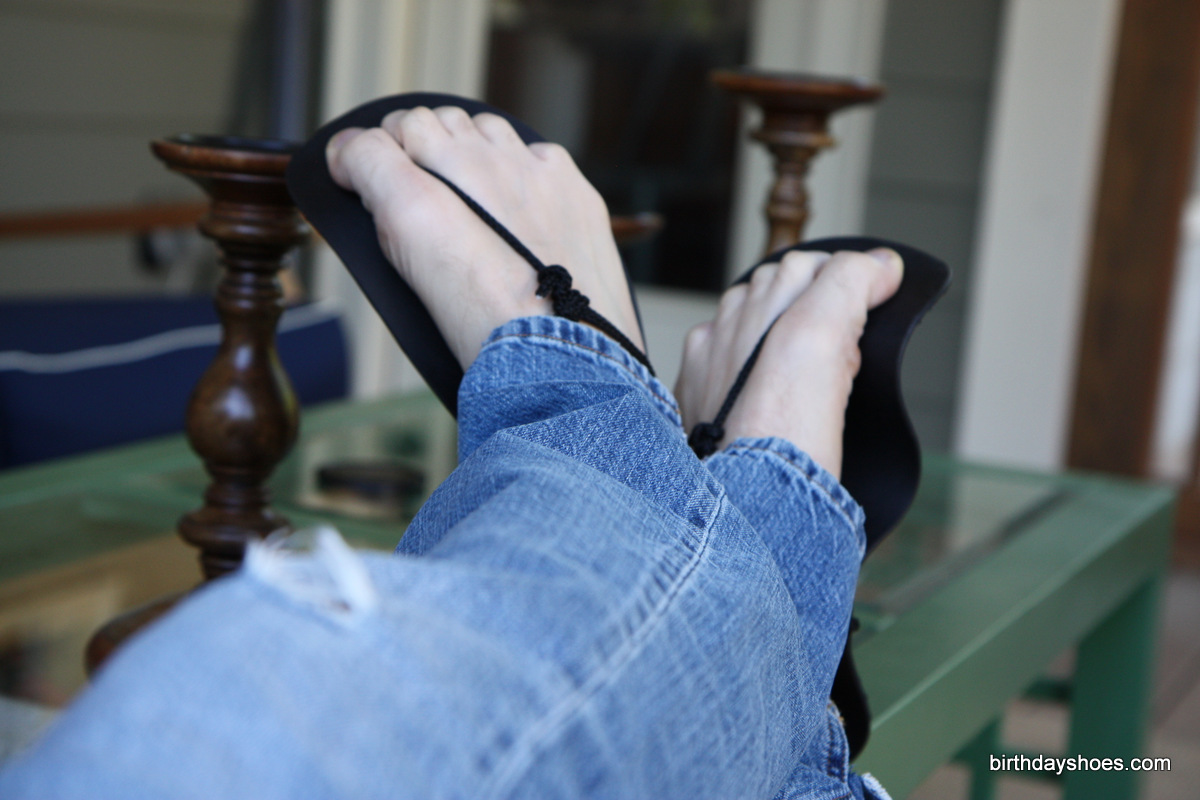
So while I don’t get quite as much ground feel, I prefer the Contact. Take a look at the photo on the right of the 4mm Connects and notice how the sole creates a wave as I flex my toes. In small ways, this happens enough to be distracting with the Connect soles that I just prefer the solid experience of the Contact. Thankfully, I find the Contact’s still have incredible ground feel but adhere better to my foot.
So between the two, I’d go for the Contact over the Connect.
Mind that if you have a shorter foot (mine is a shade under 11″ long), I think you’ll have better (and better) experiences with the thinner’s 4mm Connect’s sole rigidity. This has to do with physics (loads and levers). I’ll save more discussion on that here (questions, hit me in the comments).
Casual Summer Sandals/Huaraches
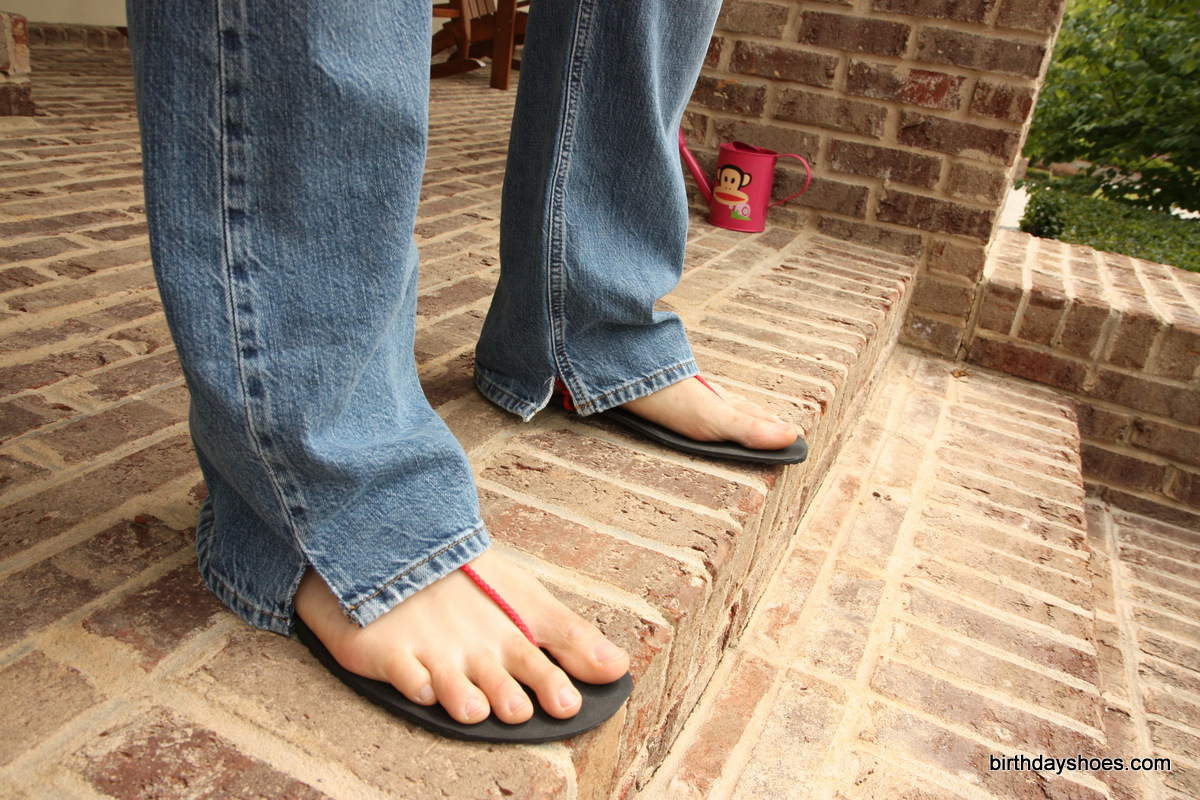
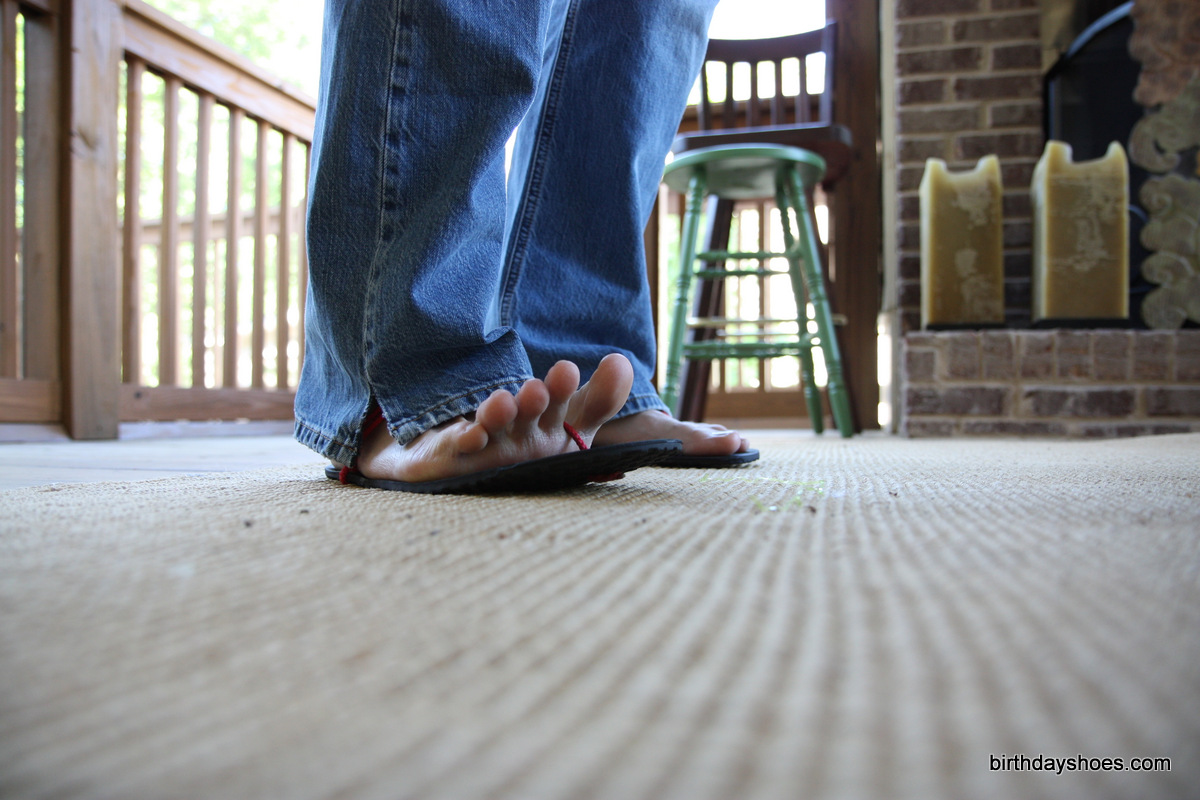
Where are the shoes? Worn with jeans, you can hardly figure out just what’s on my feet. All you see is that thin string and some rubber sole.
Books could be written about running in huaraches. It comes down to getting the lacing down right so that the sole sticks close to your foot, doesn’t slap the ground, and doesn’t slide laterally (left to right). I’m not going to review the Connect or Contact Xero Shoes as running sandals here. Suffice to say you can run in them and if you’re willing to ascend the huaraches running curve, Xero Shoes are hard to beat — they’re low cost huaraches made from quality materials.
What I
am going to talk about is how the Xero Shoes function as everyday sandals. I won’t mince words or drag this out any longer than necessary —
Xero Shoes huaraches great minimalist, casual sandals. They’re good worn with shorts or jeans for knocking around town, hitting up the park, neighborhood walks, kicking back on the beach or at the pool — they’re like flip-flops sans the gait-altering-toe-clinch-heel-drag-motion thanks to the heel of the outsole being saddled right up against your foot when you walk.
Aesthetically, Xero Shoes are so hardly there that when you wear them with a pair of jeans, all you see is a thin rope and the sole. Pictures tell that tale below. I think the aesthetic hurdle you’ll have to get over — and I’m speaking mainly to the men here — is that the overall design of a huaraches sandal is reminiscent of popular women’s sandals. That said, personally, I think they’re such minimal sandals that your foot is the real aesthetic star here. If you’ve got strong looking feet — and why wouldn’t you — well, they’re going to get a chance to shine when you wear a pair of huaraches.
For me, I tend to wear mine with shorts or jeans. I also used them as beach sandals with great success.
In the event that your IS sandals get funky or dirty, hose them off. They’re very easy to clean simply because there’s not much
to clean. And while I didn’t run this by Steven, I’d almost bet you could throw them in your dishwasher to clean them.
If you grab a pair of the black nylon laces for your Xero Shoes, you can even get away with wearing them with a pair of khakis to “dress it up.” Sandals are always going to be casual, but the black laces lend a more sophisticated look to the Xero Shoes.
Photos:
Conclusion and Best Bet
What’s left to say about these? I wasn’t really into the original DIY
Xero Shoes. It wasn’t really their fault — I just didn’t get into the Vibram Cherry, home-cut look of them and I probably didn’t give them enough of a chance to shine. That said, I knew when I saw the FeelTrue soles almost a year ago that these were now something unique that I had to try.
I have not been disappointed. While the Connects are just a little too flexible for my taste, I routinely slip on my Contacts for any number of reasons. I even did yard work in them recently and it was great because cleaning them off was such a breeze. What I really love about the Xero Shoes huaraches is the value proposition: you get a made-for-huaraches, top-notch outsole and laces that just flat out work
at an affordable price. It is incredible that you can get a DIY kit for $20-25 that comes with such a good sole — mind the Vibram cherry kits are still available and cost you basically the same amount of money. So for the money, if you’re wanting to dabble with huaraches, you really can’t go wrong starting out with a pair of Xero Shoes.
There’s only one catch that you should think about if you’re interested in picking up a pair. Assuming you’ve decided on a sole thickness, the next decision you have to make is if you want to get the DIY kit (
The Connect DIY kit is $25, which includes shipping;
the Contact DIY kit is $30), which includes the laces, the soles, a punch to make a hole for the thong, and instructions on how to lace up your pair. Alternatively, you can get them to make a custom-cut pair for you based on a tracing of your foot. This will set you back
$40 for Connect or $45 for Contact — so an extra $15, basically, over the DIY.
What do I recommend? For most people, I recommend the custom-cut pair (and the Contact sole). Why? Basically because if this is your first pair of huaraches, you’re going to be nervous about the punching and the lacing the first time out the gate. Having
Xero Shoes do this for you can help you rest easy it’s done right. It’ll save you from having to trim excess sole off the end (they’ll do this for you based on your foot tracing). It’ll also give you a tangible example of how the slip-on lacing is done. There’ll be extra lace you can either cut off (and singe the rope end) or re-lace, de-lace, or whatever. Again, my personal preference is the Contact 6mm thickness. It provides excellent ground feel and excellent rigidity through the sole, reducing any floppiness of the rubber.
If you’re a proficient do-it-yourselfer, then completely ignore the above advice and just get the kit.
Anyone can make a pair of huaraches. It just takes a little know-how (you’ve got plenty on the web) and a little patience.
I’ll wrap this up. Summer is upon us. What better time to try out a pair of huaraches?
If you want a little more background on huaraches and how they’re made, I suggest reading this
review of huaraches written by BdayShoes blogger James. If I missed anything above (and apologies that this review is so long — just a lot to say!), please let me know in the comments!
NOTE ON NAME CHANGE FROM INVISIBLE SHOES TO XERO SHOES! Summer of 2012 brought with it a re-branding and name change (and logo change) for Invisible Shoes — they changed to XERO SHOES.


22 replies on “Xero Shoes Huaraches Review (and Connect vs. Contact)”
Great review! I agree with Justin on my decision getting the Connects over the Contacts. I love my Connects and I went with the DIY kit and fortunately it fit my foot perfectly without having to cut anything. I just had to punch the thong hole and was good to go! I made my own huaraches with 6mm Vibram Cherry and bought the Connects and there is a big difference with that little extra molding to my feet with the Connects. I have not ventured running in them but I am planning on using them for some trails this weekend and see how they fare.The tread has a nice multi directional pattern and should be great. I highly recommend them. The price cant be beat for a quality huarache.
Thanks for the review, Justin! I was wondering when the Connects and Contacts would be reviewed here and I’m glad to see them featured (although I would have loved to hear more about the running experience in them)! I swore to myself I would not get into the huaraches (as I felt it a bit bizarre to run in sandals (despite being an avid VFF runner)), but finally took the plunge in January by opting for the Connects. They are absolutely great running sandals as I feel better connected (pardon the pun) to the ground. With the 4mm sole, it really does feel like there’s nothing between my feet and the ground. I prefer to run on gravel trails and rocky surfaces with them as opposed to road–perhaps because the maximum propioception makes me run even softer. Additionally, I feel that the sandals tend to not “flop” as much when I run as when I walk in them, but that doesn’t stop me from using them for everyday casual wear during the summer months! While I absolutely love Invisible Shoes, they seem to do a number on my feet. That is, the grip of the foot bed tends to create blisters or gnaw at the calluses on the balls of my feet after hitting the 5 mile mark on a run. Still, I feel that the Invisible Shoes Connects are a great bargain for a fantastic running shoe!
They’re inexpensive enough that buying a pair of each model is no-nonsense!
When you need ground feel, use your Connects; a little more protection and structure, go for your Contacts.
@Yeti,
The funny thing (to me) is that the ground feel isn’t really much different between Connect and Contact. So if you can get just one, I’d go Contact.
why.. just take a plastic bag and use it for running… can’t ya?
really now, i’d skip those since the smallest stone or anything
that can easily get stuck in your foot-
will drive you crazy during your run or walk outdoors. not even real trails, your backyard can also be a drag.
why? because those sandals have low profile without any leveling. still…
i’ll give them a try on roads.
and yes, barefoot running is amazing and it all looks good but….
how can you solve the
“tiny-something-that-gets-stuck-in-your-shoe-while-yourun-and-you-can’t-take-it
-out-unless-you-take-off-your-shoe-just-to-find-a-minute-later-that-another-something-got-stuck-again”
syndrome???
—–
remember vibram’s KSO?
mmm…. i think it stands for
KEEPS STUFF OUT… for a reason!
and guys, the kso’s have serious sole
and an allround foot protection, compared to those sansals.
still, vibram provided
them with a mesh to keep stuff out.
so imagine those sandals on a hot day,
out on the trail, full of sand, rocks,
small chunks of wood or whatever…
just my take on the sandals.
you guys, just keep up your good job
and try to improve:
how can the invisible shoes stay light and flexible yet provide top protection from debris? here’s a challenge for you, steven.
p.s-sorry for my spelling errors and all. i;m from asia.
Just got the Contact 6mm last wk. 4 mile trail run over roots, rocks and mud was amazing. Even outran a hailstorm in last 1/2 mile. Your foot will slip on the sandal if mud gets on footbed. So avoid deep mud. Planning to put 5K miles on in 5 yrs :). Oh yeah, great review!
@walk the walk
The key is that they are sandals, you don’t even have to take them off to get any debri out of them, just shake your foot.
Also kso may stand for keep stuff out, but I own two pairs, and they should be called keep stuff in. Because if you get a pebble in your kso’s, good luck finding it even when your foot is out of if.
Connect and contact look awesome by the way, great review.
@”walk the walk? mmm….” Visitor
What you do when you have a little stone between your foot and minimal sandal, is:
1. Stop
2. Take the stone out (using your five fingers or even ten if you wish)
3. Start running/walking.
All takes about 2-3s.
Great review!
I really like these sandals. I picked up a pair and I run with them frequently. I wrote my own review of them if you are interested.
http://tysongoesbarefoot.blogspot.com/
I have been wearing both the Connects and Contacts for over a year now and love them. They are the best running footwear I have come across yet (besides my own feet, of course). I modified both to use nylon webbing straps and buckles a-la the Bedrock tying method. They feel much more secure this way when I run. The mod is easy. I posted about it on the toesalad site a while back. The mod only cost about $8 per set, is easy, and requires no alteration of the footbed. The Bedrock guys posted a lot of good videos about the strapping system. Also, I added a leather top to my 4mm pair, which makes them really comfortable for walking around. I still catch the toe in my 4mm pair if I am goofing around in grass, but never when I am walking or running. The design really prevents that. As for getting debris out: Klanger is right, it only takes a second or two. I run quite a bit on crushed granite paths, and the little rocks that get between my foot and the footbed haven’t been all that bad. They are worse when I run barefoot.
I’ve both Contact and Connect types, Connects for the road if there is broken glass around (normally barefoot upto 15km). Contact for the rocky trails. Neither are any good in the wet when the gradient is very steep. As the sole grips the ground but your foot slips on the foot-bed. Other than that I’m very happy with them.
I’m an Invisible shoe 4mm user. I’ve done more than 100km and still haven’t worn out the first knot
I have been eyeballing the youtube video on how to make these for a long time, every time we have the money to buy the 4mm vibram sheets, someone’s out! one of these days! 🙂
Running in these is great. A stone in your shoe? I’ve had that in VFFs and in Xero shoes. In VFFs I have to take my shoes off to get it out, in Xero Shoes I take another step and it is gone. I have a running in Xero Shoes report here. http://nearlybarefeet.blogspot.com/2012/11/running-in-xero-shoes-huaraches.html
Great info, thnx. I recently ordered both the connect & contact to try. I currently run in vffs & merrell gloves and want to add these as another alternative depending on weather and terrain conditions.
Anyway, I was wondering if you or anyone out there has tried some of the alternative lacing techniques that are on the invisible site and if they alleviate the sole flexing issues you have. In other words, if they keep the sole more attached to your foot contour as your foot flexes.
I viewed The Shark Tank show that aired on Feb 1st (tonight) and I just had to find these shoes (sandals). I love the concept! I used to buy what we called “Jesus sandals” in my teens/early twenties years ago at Cargo Canada and when they went out of business, I was devastated I couldn’t find them anymore. Your Xerö shoes are closest I seen to them.
hi, nice site!
i have both invisible sandals & Luna sandals & vibram KSO. i only walk in sandals.
KSO is the best for “agility” sports.
i don’t see how anyone can run in these sandals.
cause grits get in between the small gap between my arch & sole occasionally. (this may be because my arch is higher than yours)
if i run, having to stop & shake my feet or clean them out like every 5 – 10 min would drive me nuts.
regards,
I agree wholeheartedly with this review. I am not a runner, just trying to better health through barefoot living. I currently have three pairs of Xeroshoes — two Contact in fun colors and one Connect in black for formal wear. Nine times out of ten I put on the Contacts because that extra little bit of structure makes them so wearable on a daily basis. The downside of wearing my Xeroshoes every single day is that when I have to put on my VFFs or one of my three pairs of SoftStar shoes, my toes feel confined because they are no longer in sandals. Xeroshoes has ruined me for anything else and I fear that come winter I will be doing the toesocks and sandals thing.
Thanks for such a thoughtful, thorough review!
My name is Sally and I am writing because I have plantar fasciitis. As a keen walker and hiker, I feared this would rob me of my most cherished hobby – along with walking the dog. However, after talking to physicians and experts, it turned out that walking might be the best solution to the problem.
As I happen to also be a freelance health and outdoors writer, I’ve teamed up with a small hiking site to develop a guide covering what plantar fasciitis is, and how walking affects it – and could be a solution to it. If you have an extra minute, you can check out the article here: http://backpackerverse.com/walking-with-plantar-fasciitis/.
I know you are busy, so I’ll keep this quick. Recently, I came across birthdayshoes.com and you reminded me of my article. Having read https://birthdayshoes.com/vibram-five-fingers-help-with-plantar-fasciitis I thought this would be something you’d like to mention. Of course, I am more than happy to write a brief introduction to the article to put on your website.
Please let me know what you think!
Best Regards,
Sally,
Hi Justin, my feet are about 7-8 inches long, so they’re pretty short. You mentioned that the 4mm sandals are more suitable for short feet. Could you explain that a little further? I would like to get the Contacts for the, well, contact the soles have with your feet/structure. I also am looking for protection and am worried that the 4mm sandals might not provide enough. However, I of course am looking for a close-to-barefoot feel, so if the 6mms are too rigid for small feet, I would be concerned about that, as well. I know this is an old post, so hopefully you still have information on these shoes! Thanks!
@Sonja
You know, to be totally candid, I don’t remember exactly what I had in mind when I wrote that 7 years ago (or so). But if I think about it, I imagine it has to do with the relative rigidity of the sole over a longer foot compared to a shorter foot, which is to say that a longer foot has a longer lever to bend the sole than a shorter foot.
No matter what, I don’t think you can really go wrong with 4mm or 6mm — just know that the 4mm is very flimsy and the 6mm has a bit more toughness to it. If you choose the 6mm, I think you end up picking a very safe bet and I doubt you’ll miss extra flexibility … and if you want more later you can always upgrade 😉